ffmpeg 音视频学习之ffmpeg常用基础命令整理 基于windows环境安装好必要的ffmpeg 后,对ffmpeg基础命令进行一些了解:
原文链接:https://blog.csdn.net/yun6853992/article/details/121870328
1、ffmpeg查看版本: 2、ffmpeg查询命令: ffmpeg -h muxer=flv ffmpeg -h filter =atempo (atempo调整音频播放速率) ffmpeg -h encoder=libx264
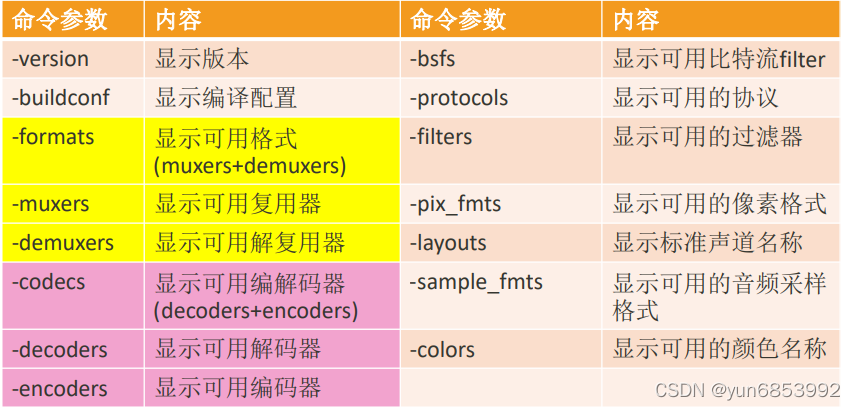
3、ffmpeg分类查询命令:
-version -buildconf -protocols -formats -filters -muxers -demuxers -codecs -decoders -encoders -layouts -pix_fmts -sample_fmts -bsfs -colors
4、ffmpeg基础命令: 更多参考: http://www.ffmpeg.org/ffmpeg.html
ffmpeg -i test.mp4 -b:a 192k -ar 48000 -ac 2 -acodec libmp3lame -aframes 200 out2.mp3 ffmpeg -i test.mp4 -vframes 300 -b:v 300k -r 30 -s 640x480 -aspect 16 :9 -vcodec libx265
5、ffmepg使用命令提取音频或视频: ffmpeg -i test.mp4 -acodec copy -vn audio.mp4 ffmpeg -i test.mp4 -vcodec copy -an video.mp4 保留编码格式:ffmpeg -i test.mp4 -vcodec copy -an test_copy.h264 强制格式:ffmpeg -i test.mp4 -vcodec libx264 -an test.h264 保留编码格式:ffmpeg -i test.mp4 -acodec copy -vn test.aac 强制格式:ffmpeg -i test.mp4 -acodec libmp3lame -vn test.mp3 ffmpeg -i test_1280x720.mp4 -t 3 -pix_fmt yuv420p yuv420p_orig.yuv ffmpeg -i test_1280x720.mp4 -t 3 -pix_fmt yuv420p -s 320x240 yuv420p_320x240.yuv ffmpeg -i test.mp4 -t 3 -pix_fmt rgb24 -s 320x240 rgb24_320x240.rgb ffmpeg -s 320x240 -pix_fmt yuv420p -i yuv420p_320x240.yuv -pix_fmt rgb24 rgb24_320x240_2.rgb ffmpeg -i buweishui.mp3 -ar 48000 -ac 2 -f s16le 48000_2_s16le.pcm ffmpeg -i buweishui.mp3 -ar 48000 -ac 2 -sample_fmt s16 out_s16.wav ffmpeg -i buweishui.mp3 -ar 48000 -ac 2 -codec:a pcm_s16le out2_s16le.wav ffmpeg -i buweishui.mp3 -ar 48000 -ac 2 -f f32le 48000_2_f32le.pcm ffmpeg -i test.mp4 -t 10 -vn -ar 48000 -ac 2 -f f32le 48000_2_f32le_2.pcm
6、ffmpeg命令转封装: ffmpeg -i test.mp4 -vcodec copy -acodec copy test_copy.ts ffmpeg -i test.mp4 -codec copy test_copy2.ts ffmpeg -i test.mp4 -vcodec libx265 -acodec libmp3lame out_h265_mp3.mkv ffmpeg -i test.mp4 -r 15 -codec copy output.mp4 ffmpeg -i test.mp4 -r 15 output2.mp4 ffmpeg -i test.mp4 -b 400k output_b.mkv ffmpeg -i test.mp4 -b:v 400k output_bv.mkv ffmpeg -i test.mp4 -b:a 192k output_ba.mp4 ffmpeg -i test.mp4 -b:v 400k -b:a 192k output_bva.mp4 ffmpeg -i test.mp4 -s 480x270 output_480x270.mp4 ffmpeg -i test.mp4 -ar 44100 output_44100hz.mp4
7、ffmpeg过滤器命令: ffmpeg -i 沙海02. mp4 -ss 00 :05:00 -t 10 -codec copy 1. mp4 ffmpeg -i 复仇者联盟3. mp4 -ss 00 :05:00 -t 10 -codec copy 2. mp4 ffmpeg -i 红海行动.mp4 -ss 00 :05:00 -t 10 -codec copy 3. mp4 ffmpeg -i 1. mp4 -codec copy -vbsf h264_mp4toannexb 1. ts ffmpeg -i 2. mp4 -codec copy -vbsf h264_mp4toannexb 2. ts ffmpeg -i 3. mp4 -codec copy -vbsf h264_mp4toannexb 3. ts ffmpeg -i 1. mp4 -codec copy 1. flv ffmpeg -i 2. mp4 -codec copy 2. flv ffmpeg -i 3. mp4 -codec copy 3. flv 方法1 :ffmpeg -i "concat:1.mp4|2.mp4|3.mp4" -codec copy out_mp4.mp4 方法2 :ffmpeg -f concat -i mp4list.txt -codec copy out_mp42.mp4 方法1 :ffmpeg -i "concat:1.ts|2.ts|3.ts" -codec copy out_ts.mp4 方法2 :ffmpeg -f concat -i tslist.txt -codec copy out_ts2.mp4 方法1 :ffmpeg -i "concat:1.flv|2.flv|3.flv" -codec copy out_flv.mp4 方法2 :ffmpeg -f concat -i flvlist.txt -codec copy out_flv2.mp4 ffmpeg -i 2. mp4 -vcodec copy -acodec ac3 -vbsf h264_mp4toannexb 2. ts ffmpeg -i "concat:1.ts|2.ts|3.ts" -codec copy out1.mp4 结果第二段没有声音 ffmpeg -i 2. mp4 -vcodec copy -acodec aac -ar 96000 -vbsf h264_mp4toannexb 2. ts ffmpeg -i "concat:1.ts|2.ts|3.ts" -codec copy out2.mp4 第二段播放异常 ffmpeg -i 1. mp4 -acodec copy -vcodec libx265 1. ts ffmpeg -i "concat:1.ts|2.ts|3.ts" -codec copy out3.mp4 ffmpeg -i 1. mp4 -acodec copy -vcodec libx264 -s 800x472 -vbsf h264_mp4toannexb 1. ts ffmpeg -i "concat:1.ts|2.ts|3.ts" -codec copy out4.mp4
8、ffmpeg 图片与视频互转: ffmpeg -i test.mp4 -y -f image2 -ss 00 :00 :02 -vframes 1 -s 640x360 test.jpg ffmpeg -i test.mp4 -y -f image2 -ss 00 :00 :02 -vframes 1 -s 640x360 test.bmp -i 输入 -y 覆盖 -f 格式 image2 一种格式 -ss 起始值 -vframes 帧 如果大于1 那么 输出加%03d test%03d.jpg -s 格式大小size ffmpeg -i test.mp4 -t 5 -s 640x360 -r 15 frame%03d.jpg ffmpeg -f image2 -i frame%03d.jpg -r 25 video.mp4 ffmpeg -i test.mp4 -t 5 -r 1 image1.gif ffmpeg -i test.mp4 -t 5 -r 25 -s 640x360 image2.gif ffmpeg -f gif -i image2.gif image2.mp4
9、ffmpeg 视频录制命令: 有时候写入MP4文件会不成功,改成flv就好
ffmpeg -list_devices true -f dshow -i dummy 桌面: ffmpeg -f dshow -i video="screen-capture-recorder" v-out.mp4 摄像头: ffmpeg -f dshow -i video="Integrated Webcam" -y v-out2.flv (要根据自己摄像头名称) 系统声音: ffmpeg -f dshow -i audio="virtual-audio-capturer" a-out.aac 系统+麦克风声音: ffmpeg -f dshow -i audio="麦克风 (Realtek(R) Audio)" -f dshow -i audio="virtual-audio-capturer" -filter_complex amix=inputs=2 :duration=first:dropout_transition=2 a-out2.aac ffmpeg -f dshow -list_options true -i video="screen-capture-recorder" ffmpeg -f dshow -list_options true -i audio="virtual-audio-capturer" ffmpeg -f dshow -list_options true -i audio="麦克风 (Realtek(R) Audio)" ◼ ffmpeg -f dshow -i audio="麦克风 (Realtek(R) Audio)" -f dshow -i audio="virtual-audio-capturer" -filter_complex amix=inputs=2 :duration=first:dropout_transition=2 -f dshow -video_size 1920x1080 -framerate 15 -pixel_format yuv420p -i video="screen-capture-recorder" -vcodec h264_qsv -b:v 3M -y av-out.flv ◼ ffmpeg -f dshow -i audio="麦克风 (Realtek(R) Audio)" -f dshow -i audio="virtual-audio-capturer" -filter_complex amix=inputs=2 :duration=first:dropout_transition=2 -f dshow -i video="screen-capture-recorder" -vcodec h264_qsv -b:v 3M -r 15 -y av-out2.mp4 ◼ ffmpeg -f dshow -i audio="麦克风 (Realtek(R) Audio)" -f dshow -i audio="virtual-audio-capturer" -filter_complex amix=inputs=2 :duration=first:dropout_transition=2 -f dshow -framerate 15 -pixel_format yuv420p -i video="screen-capture-recorder" -vcodec h264_qsv -b:v 3M -r 15 -y av-out3.mp4
10、ffmpeg直播推流/拉流命令: ffplay rtmp://server/live/streamName ffmpeg -i rtmp://server/live/streamName -c copy dump.flv 对于不是rtmp的协议 -c copy要谨慎使用 HKS:rtmp://live.hkstv.hk.lxdns.com/live/hks2 大熊兔(点播):rtsp://184.72 .239 .149 /vod/mp4://BigBuckBunny_175k.mov CCTV1高清:http://ivi.bupt.edu.cn/hls/cctv1hd.m3u8 ffmpeg -i http://ivi.bupt.edu.cn/hls/cctv1hd.m3u8 -c copy cctv1.ts ffmpeg -i http://ivi.bupt.edu.cn/hls/cctv1hd.m3u8 cctv1.flv ffmpeg -i http://ivi.bupt.edu.cn/hls/cctv1hd.m3u8 -acodec aac -vcodec libx264 cctv1-2. flv CCTV3高清:http://ivi.bupt.edu.cn/hls/cctv3hd.m3u8 CCTV5高清:http://ivi.bupt.edu.cn/hls/cctv5hd.m3u8 CCTV5+高清:http://ivi.bupt.edu.cn/hls/cctv5phd.m3u8 CCTV6高清:http://ivi.bupt.edu.cn/hls/cctv6hd.m3u8 ffmpeg -re -i out.mp4 -c copy flv rtmp://server/live/streamName -re,表示按时间戳读取文件
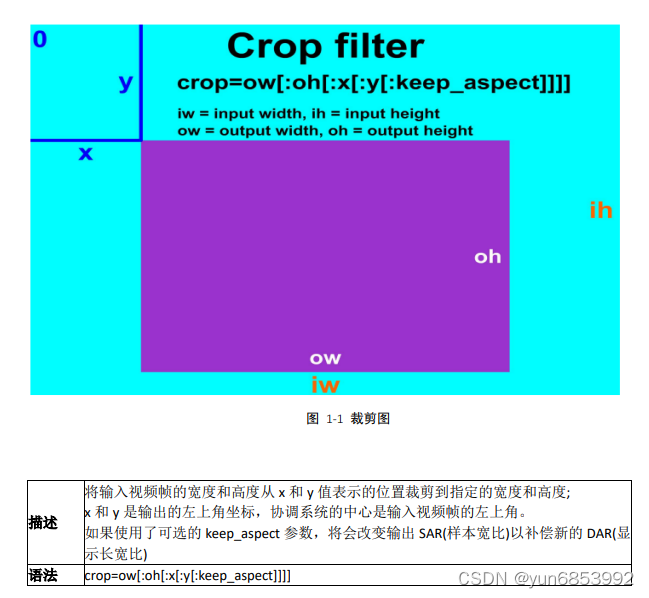
11、ffmpeg filter过滤器应用:
x, y 对 x 的计算值(从左上角水平方向的像素个数)和 y(垂直像素的数量),对每个帧进行评估,x的默认值为(iw - ow)/2 , y 的默认值为(ih - oh)/2 in_w, iw 输入的宽度 in_h, ih 输入的高度 out_w,ow 输出(裁剪)宽度,默认值= iw out_h,oh 输出(裁剪)高度,默认值= ih a 纵横比,与 iw/ih 相同 sar 输入样本比例 dar 输入显示宽比,等于表达式 a*sar hsub, vsub 水平和垂直的色度子样本值,对于像素格式 yuv422p, hsub 的值为 2 ,vsub 为 1 n 输入帧的数目,从 0 开始 pos 位置在输入框的文件中,如果不知道 NAN t 时间戳以秒表示,如果输入时间戳未知 ow 的值可以从 oh 得到,反之亦然,但不能从 x 和 y 中得到,因为这些值是在 ow 和 oh 之后进行的。 x 的值可以从 y 的值中得到,反之亦然。 ffmpeg -i input -vf crop=iw/3 :ih:0 :0 output ffmpeg -i input -vf crop=iw/3 :ih:iw/3 :0 output ffmpeg -i input -vf crop=iw/3 :ih:iw/3 *2 :0 output (1 )裁剪 100x100 的区域,起点为(12 ,34 ). crop=100 :100 :12 :34 相同效果: crop=w=100 :h=100 :x=12 :y=34 (2 )裁剪中心区域,大小为 100x100 crop=100 :100 (3 )裁剪中心区域,大小为输入视频的 2 /3 crop=2 /3 *in_w:2 /3 *in_h (4 )裁剪中心区域的正方形,高度为输入视频的高 crop=out_w=in_h crop=in_h (5 )裁剪偏移左上角 100 像素 crop=in_w-100 :in_h-100 :100 :100 (6 )裁剪掉左右 10 像素,上下 20 像素 crop=in_w-2 *10 :in_h-2 *20 (7 )裁剪右下角区域 crop=in_w/2 :in_h/2 :in_w/2 :in_h/2
编译的时候需要支持 FreeType、FontConfig、iconv,系统中需要有相关的子库,
在 FFmpeg 中增加纯字母水印可以使用 drawtext 滤镜进行支持:
drawtext text textfile box boxcolor font fontsize x y alpha
相关使用实例:
ffplay -i input .mp4 -vf "drawtext=fontsize=100:fontfile=FreeSerif.ttf:text='hello world':x=20:y=20" ffplay -i input .mp4 -vf "drawtext=fontsize=100:fontfile=FreeSerif.ttf:text='hello world':fontcolor=green" ffplay -i input .mp4 -vf "drawtext=fontsize=100:fontfile=FreeSerif.ttf:text='hello world':fontcolor=green:x=400:y=200" ffplay -i input .mp4 -vf "drawtext=fontsize=100:fontfile=FreeSerif.ttf:text='helloworld':fontcolor=green:x=400:y=200:alpha=0.5" ffplay -i input .mp4 -vf "drawtext=fontsize=100:fontfile=FreeSerif.ttf:text='hello world':fontcolor=green:box=1:boxcolor=yellow" ffplay -i input .mp4 -vf "drawtext=fontsize=60:fontfile=FreeSerif.ttf:text='%{localtime\:%Y\-%m\-%d %H-%M-%S}':fontcolor=gree n:box=1:boxcolor=yellow" ffmpeg -re -i input .mp4 -vf "drawtext=fontsize=60:fontfile=FreeSerif.ttf:text='%{localtime\:%Y\-%m\-%d %H-%M-%S}':fontcolor=gree n:box=1:boxcolor=yellow" out.mp4 ffplay -i input .mp4 -vf "drawtext=fontsize=60:fontfile=FreeSerif.ttf:text='test':fontcolor=green:box=1:boxcolor=yellow:enable=lt(mod(t\,3)\,1)" lt(x, y) Return 1 if x is lesser than y, 0 otherwise. mod(x, y) Compute the remainder of division of x by y. ffplay -i input .mp4 -vf "drawtext=fontsize=100:fontfile=FreeSerif.ttf:text='helloworld':x=mod(100*t\,w):y=abs(sin(t))*h*0.7" ffplay -i input .mp4 -vf "drawtext=fontsize=40:fontfile=FreeSerif.ttf:text='liaoqingfu':x=mod(50*t\,w):y=abs(sin(t))*h*0.7:alpha=0.5:fontcolor=white:enable=lt(mod(t\,3)\,1)"
为视频添加图片水印可以使用 movie 滤镜,相关参数:
filename format_name, f stream_index, si seek_point, sp streams, s loop discontinuity ffmpeg -i input .mp4 -vf "movie=logo.png[watermark];[in][watermark]overlay=x=10:y=10[out]" output.mp4 main_w main_h overlay_w overlay_h 左上角 10 :10 右上角 main_w-overlay_w-10 :10 左下角 10 :main_h-overlay_h-10 右下角 main_w-overlay_w-10 :main_h-overlay_h-10
使用实例:
ffplay -i input .mp4 -vf "movie=logo.png[logo];[in][logo]overlay=50:10[out]" ffplay -i input .mp4 -vf "movie=logo2.png[watermark];[in][watermark]overlay=50:10[out]" ffplay -i input .mp4 -vf "movie=logo.png[watermark];[in][watermark]overlay=10:10[out]" ffplay -i input .mp4 -vf "movie=logo.png[watermark];[in][watermark]overlay=main_w-overlay_w-10:10[out]" ffplay -i input .mp4 -vf "movie=logo.png[watermark];[in][watermark]overlay=10:main_h-overlay_h-10[out]" ffplay -i input .mp4 -vf "movie=logo.png[watermark];[in][watermark]overlay=main_w-overlay_w-10:main_h-overlay_h-10[out]" ffplay -i input .mp4 -vf "movie=logo.png[watermark];[in][watermark]overlay=x=mod(50*t\,main_w):y=abs(sin(t))*h*0.7[out]"
可以通过 overlay 将 多个视频流、多个多媒体采集设备、多个视频文件合并到一个界面中,生成画中画的效果。
相关参数介绍:
x 字符串 X 坐标 y 字符串 Y 坐标 eof_action 整数 遇到 eof 表示时的处理方式,默认为重复 ➢ repeat(值为 0 ):重复前一帧 ➢ endcall(值为 1 ):停止所有的流 ➢ pass (值为 2 ):保留主图层 shortest 布尔 终止最短的视频时全部终止(默认 false) format 整数 设置 output 的像素格式,默认为 yuv420 ➢ yuv420 (值为 0 ) ➢ yuv422 (值为 1 ) ➢ yuv444 (值为 2 ) ➢ rgb (值为 3 ) ffplay -i input .mp4 -vf "movie=sub_320x240.mp4[sub];[in][sub]overlay=x=20:y=20[out]" ffplay -i input .mp4 -vf "movie=sub_320x240.mp4[sub];[in][sub]overlay=x=20:y=20:eof_action=1[out]" ffplay -i input .mp4 -vf "movie=sub_320x240.mp4[sub];[in][sub]overlay=x=20:y=20:shortest =1[out]" ffplay -i input .mp4 -vf "movie=sub_320x240.mp4,scale=640x480[sub];[in][sub]overlay=x=20:y=20[out]" ffplay -i input .mp4 -vf "movie=sub_320x240.mp4[test];[in][test]overlay=x=mod(50*t\,main_w):y=abs(sin(t))*main_h*0.7[out]"
从前文中可以看出进行视频图像处理时,overlay 滤镜为关键画布,可以通过 FFmpeg建立一个画布,也可以使用默认的画布。如果想以多宫格的方式展现,则可以自己建立一个足够大的画布, 下面就来看一下多宫格展示的例子:
ffmpeg -i 1. mp4 -i 2. mp4 -i 3. mp4 -i 4. mp4 -filter_complex "nullsrc=size=640x480[base];[0:v] setpts=PTS-STARTPTS,scale=320x240[upperleft];[1:v]setpts=PTS-STARTPTS,scale=320x240[upperright];[2:v]setpts=PTS-STARTPTS, scale=320x240[lowerleft];[3:v]setpts=PTS-STARTPTS,scale=320x240[lowerright];[base][upperleft]overlay=shortest=1[tmp1];[tmp1][upperright]overlay=shortest=1:x=320[tmp2];[tmp2][lowerleft]overlay=shortest=1:y=240[tmp3];[tmp3][lowerright]overlay=shortest=1:x=320:y=240" out.mp4 ffmpeg -i 1. mp4 -i 2. mp4 -i 3. mp4 -i 4. mp4 -filter_complex "nullsrc=size=640x480[base];[0:v]setpts=PTS-STARTPTS,scale=320x240[upperleft];[1:v]setpts=PTS-STARTPTS,scale=320x240[upperright];[base][upperleft]overlay=shortest=1[tmp1];[tmp1][upperright]overlay=shortest=1:x=320" out2.mp4
ffmpeg.exe -i inputfile.mp4 -filter_complex [0 :v]reverse[v] -map [v] -preset superfast reversed .mp4 ffmpeg.exe -i inputfile.mp4 -vf reverse reversed .mp4 ffmpeg.exe -i inputfile.mp4 -map 0 -c:v copy -af "areverse" reversed_audio.mp4 ffmpeg.exe -i test.mp4 -vf reverse -af areverse -preset superfast outtest.mp4 ffprobe.exe -v error -select_streams v:0 -show_entries stream=duration -of default=noprint_wrappers=1 :nokey=1 input .mp4 ffprobe.exe -v error -select_streams a:0 -show_entries stream=duration -of default=noprint_wrappers=1 :nokey=1 input .mp4 ffplay.exe -i input .nv21 -pix_fmt nv21 -s 4624x3472 ffmpeg -y -s 1920x1080 -pix_fmt nv21 -i image.nv21.yuv image.jpg ffmpeg -i input .jpg -pix_fmt nv21 output_1080x1920.yuv ffmpeg -f rawvideo -pixel_format rgba -video_size 1080x1920 -i input .raw output.png ffmpeg -i input .jpg -vcodec rawvideo -pix_fmt rgba raw1.rgb ffmpeg.exe -i input .mp4 -map 0 :0 -vcodec copy -acodec copy output.mp4 -map 0 :0 : -map 0 :1 : -vcodec copy: -acodec copy:
12、分离H264或mpeg2video视频格式数据命令: ffmpeg -i source.200 kbps.768 x320_10s.flv -vcodec libx264 -an -f h264 source.200 kbps.768 x320_10s.h264 ffmpeg -i source.200 kbps.768 x320_10s.flv -vcodec mpeg2video -an -f mpeg2video source.200 kbps.768 x320_10s.mpeg2v ffplay -pixel_format yuv420p -video_size 768x320 -framerate 25 source.200 kbps.768 x320_10s.yuv
13、ffmpeg 命令查找重定向(-f fmt 对应的参数) 14、ffmpeg其他基础命令: $ ffmpeg -i input .mp4 $ ffmpeg -i input .mp4 -hide_banner $ ffmpeg -i input .aac -i input .mp4 output.mp4 $ffmpeg -ss 01:23 :45 -i input -vframes 1 -q:v 2 output.jpg $ ffmpeg -loop 1 -i cover.jpg -i input .mp3 -c:v libx264 -c:a aac -b:a 192k -shortest output.mp4
15、花屏 绿屏 绿屏的主要是: 无法渲染的画面有些用黑色填充,有些用绿色填充,有些用上一帧画面填充。
===> 视频参数改变, 而解码端的SPS&PPS信息未及时重新获取更新,会导致画面无法正常渲染,继而导致绿屏的现象出现。
15.1:全屏花屏: 正常花屏:
==>码率特别低的时候出现的大面积马赛克,编码器每秒产生的视频数据太少。
==>视频参数问题:
======>视频源修改过视频参数(如从720P修改1080P),此时客户端用于解码的SPS&PPS如果没有重新获取的话,就会出现整个画面花屏的现象。
======>不会恢复。
15.2:局部花屏: SO_SNDBUF的Buffer太小,丢失P帧
P帧丢失。
总结:视频播放时,相关SPS和PPS参数不匹配/丢帧